This tutorial contains lots of widget areas that can be used in Genesis child themes.
One of the reasons why I use Genesis themes is all the information that is available on how to use it.
StudioPress Genesis Child themes
To add a widget area to any theme you need to know the areas you can add it to called a hook.
For Genesis there is a visual hook guide so one can see the name of each section.
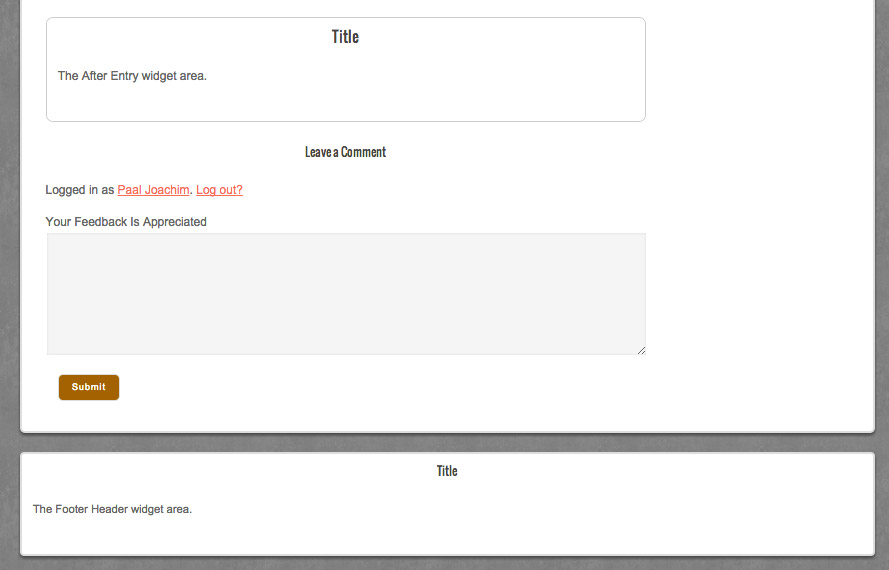
The After Entry and Footer Header widget areas.
Some are based on the Genesis child theme Metro by StudioPress.
I made the The After Entry widget area which is located on single post pages below the content
and the Footer Header widget area which is located just above the Footer widgets.
The after entry widget area and the footer header widget area.
The after entry post widget area
The following will only be visible in single posts screen after the post/article.
In the Child theme functions.php file I added:
(NB! replace any mention of the theme name metro with the theme name you are using.)
genesis_register_sidebar( array(
    'id' => 'after-entry',
    'name' => __( 'After Entry', 'metro' ),
    'description' => __( 'This is the after entry section.', 'metro' ),
 ) );
Since it will only be visible after the post we also need to add some additional code:
//* Hooks after-entry widget area to single posts -- Widget at the end of posts
 add_action( 'genesis_entry_footer', 'after_post' );
 function after_post() {
        if ( ! is_singular( 'post' ) )
        return;
         genesis_widget_area( 'after-entry', array(
        'before' => '<div class="after-entry widget-area"><div class="wrap">',
        'after' => '</div></div>',
   ) );
}
The widget is added right before the footer area begins. A check is made: ! is_singualar with a following return meaning if it is not a single page then do nothing. The next code will be the default for all single pages. A widget will be seen in all single post pages. Which can then be used for for instance an author widget or something else that may follow right after the post and before the comments area.
The CSS:
.after-entry {
   /* background: url(assets/img/lines.png); */
   border-radius: 10px;
   border: 1px solid #ccc;
   background-size: 8px 8px;
   margin-top: 5px;
}

.after-entry .wrap {
   background-color: #fff;
   padding: 32px;
}

.after-entry p {
   margin-bottom: 20px;
}

after-entry .widget-title,
.archive-title,
.comments-title,
.widget .entry-title {
   font-size: 20px;
}
NB! Genesis has a built-in shortcode for the after entry widget so one can use this code instead inside the functions.php file:
//* Add support for after entry widget
add_theme_support( 'genesis-after-entry-widget-area' );
The footer header section
This widget section I call the footer header which is to be included before the footer widgets.
In the functions.php file add the following:
//* Since I want to keep this section before the footer section I am adding this code before the following footer widgets code.
add_action( 'genesis_after', 'add_genesis_footer_header' );
function add_genesis_footer_header() {
      genesis_widget_area( 'footer-header', array(
  'before' => '<div class="footer-header widget-area">',
  'after' => '</div>',
 ) );
}

/* Add the following code to where widgets are registered area of the functions file */
genesis_register_sidebar( array(
  'id' => 'footer-header',
  'name' => __( 'Footer Header', 'genesis' ),
  'description' => __( 'This is the Footer Header.', 'custom' ),
) );
The CSS:
/* Added as an extra area right above the footer. */
.footer-header {
   background-color: #fff;
   clear: both;
   font-size: 15px;
   margin: 25px auto;
   max-width: 1140px;
   /* padding: 36px 36px 0; */
   border: 3px solid #DDD;
   border-radius: 6px;
   box-shadow: 0px 1px 10px -4px #000, 0px 0px 40px #EEEEEE;
   box-shadow: 0px 3px 5px #444;
   width: 100%;
   padding: 15px;
}

/* Inner Footer Header area */
.footer-header .wrap {
   padding: 8px;
   background: #f1f1f1;
}
A lot more widget areas that can be used in Genesis child themes.
The body background widget area
Checking out the Background slider master plugin I could see the CSS in how they made the background slider stick behind all the content.
I made a new background body widget area that I now can add sliders, text, images etc to and it will stick behind all the content on the page.
What you see in the following screenshot:
– Background image (blue background) I added into the CSS body background.
– A slider added into the body background widget area.
– Background widget with text.
– Header right widget area containing a custom menu.
As I scroll the blue background image and slider is fixed and stays in place. The custom menu floats above.
(As it is now I am not able to control the slider as I believe the controls would be under the other page layers – content, header etc.)
In the functions.php file add the following:
// In the body of the page.
genesis_register_sidebar( array(
 'id' => 'body-background-widget',
 'name' => __( 'Body Background', 'custom-genesis-sample' ),
 'description' => __( 'Body Background area.', 'custom-genesis-sample' ),
) );

add_action( 'genesis_before', 'add_body_widget_area' );
function add_body_widget_area() {
 genesis_widget_area( 'body-background-widget', array(
 'before' => '<div class="body-background-widget widget-area">',
 'after' => '</div>',
 ) );

}
Add the following code to your CSS stylesheet.
.body-background-widget {
 background: #fcfcfc url('images/Blue-bubbles.jpg') no-repeat left top;

 position: fixed;
 overflow: hidden;
 width: 100%;
 height: 100%;
 top: 28px;
 z-index: -1;
}
It might be best to download a widget plugin to control where you are using the body background widget (I prefer the content aware sidebars plugin). Or use CSS to define where you want to use the widget section. To what you see above in the screenshot I used the following CSS. This needs to be improved but is a good start.
.home .body-background-widget,
.single .body-background-widget {
 display: none;
}
.page-id-618 .body-background-widget {
 background: #fcfcfc url('images/Blue-bubbles.jpg') no-repeat left top;
 position: fixed;
 overflow: hidden;
 width: 100%;
 height: 100%;
 top: 28px;
 z-index: -1;
}
.page-id-618 .preheader-container,
.page-id-618 .footer-header,
.page-id-618 .footer-widgets {
 display: none;
}
.page-id-618 .site-header {
 width: 300px;
 background: none;
}
A large home page filled with widget areas
As I made a new site with lots of widget areas I will continue this article by adding them in.
This is in addition to the above and the home widgets area tutorial.
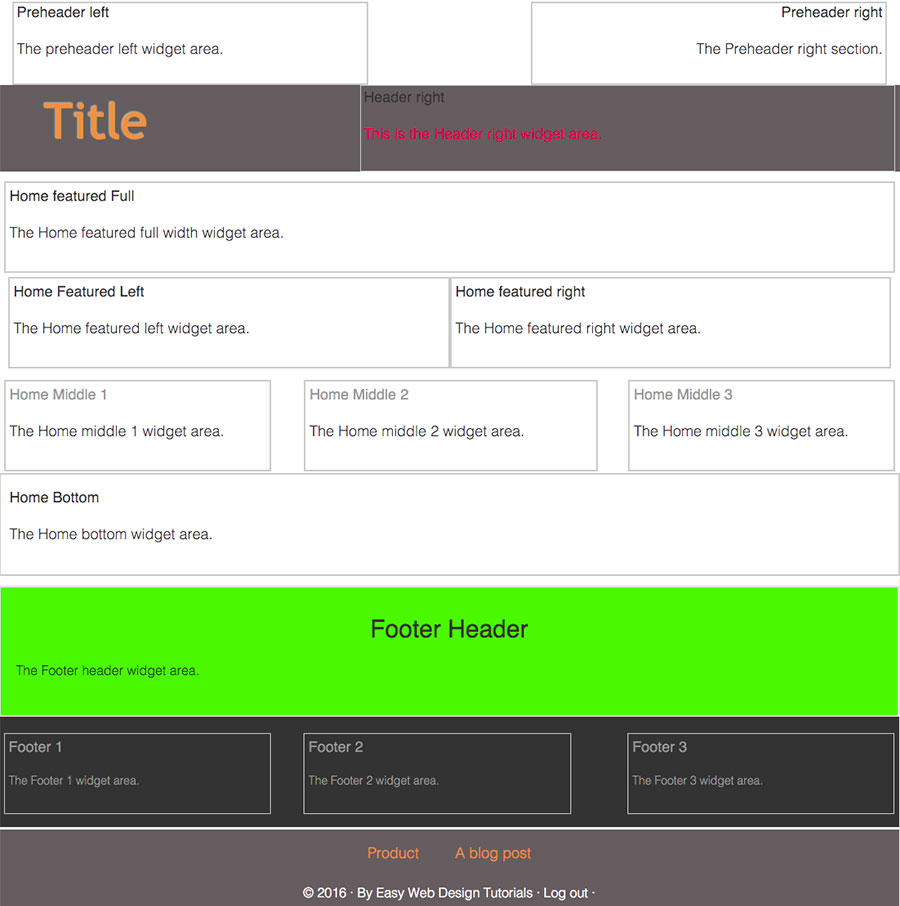
Widget areas used in the above screenshot:
Preheader left
Preheader right
Header right
Home featured full
Home featured left
Home featured right
Home middle 1, 2 and 3
Home bottom
Footer header
Footer 1, 2 and 3
A footer menu location.
In the functions.php file add the following:
/*---------------- WIDGET Areas  Code placed into the functions.php file ------------------*/
//Position the PreHeader Area containing the preheader left and right.
function genesischild_preheader_widget() {
 echo '<section class="preheadercontainer"><div class="wrap">';
 genesis_widget_area ( 'preheaderleft' );
 genesis_widget_area ( 'preheaderright' );
 echo '</div></section>';
}

/* ----- Pre Header Widgets ------ */
genesis_register_widget_area(
 array(
 'id' => 'preheader-left',
 'name' => __( 'Preheader Left', 'custom-genesis-sample' ),
 'description' => __( 'This is the pre header left widget area', 'custom-genesis-sample' ),
 )
);

genesis_register_widget_area(
 array(
 'id' => 'preheader-right',
 'name' => __( 'Preheader Right', 'custom-genesis-sample' ),
 'description' => __( 'This is the pre header right widget area', 'custom-genesis-sample' ),
 )
);

/* Adding a container to contain both preheader left and right */
add_action( 'genesis_before_header', 'my_pre_header' );
function my_pre_header() {
echo '<div class="preheader-container"><div class="wrap">';
 genesis_widget_area( 'preheader-left', array(
 'before' => '<div class="preheader-left widget-area one-half first">',
 'after' => '</div>',
 ) );

 genesis_widget_area( 'preheader-right', array(
 'before' => '<div class="preheader-right widget-area one-half">',
 'after' => '</div>',
 ) );
 echo '</div></div>';
}

// Home page widgets
genesis_register_sidebar( array(
 'id' => 'home-featured-full',
 'name' => __( 'Home Featured Full', 'custom-genesis-sample' ),
 'description' => __( 'This is the featured section if you want full width.', 'custom-genesis-sample' ),
) );

genesis_register_sidebar( array(
 'id' => 'home-featured-left',
 'name' => __( 'Home Featured Left', 'custom-genesis-sample' ),
 'description' => __( 'This is the featured section left side.', 'custom-genesis-sample' ),
) );

genesis_register_sidebar( array(
 'id' => 'home-featured-right',
 'name' => __( 'Home Featured Right', 'custom-genesis-sample' ),
 'description' => __( 'This is the featured section right side.', 'custom-genesis-sample' ),
) );

genesis_register_sidebar( array(
 'id' => 'home-middle-1',
 'name' => __( 'Home Middle 1', 'custom-genesis-sample' ),
 'description' => __( 'This is the home middle left section.', 'custom-genesis-sample' ),
) );

genesis_register_sidebar( array(
 'id' => 'home-middle-2',
 'name' => __( 'Home Middle 2', 'custom-genesis-sample' ),
 'description' => __( 'This is the home middle center section.', 'custom-genesis-sample' ),
) );

genesis_register_sidebar( array(
 'id' => 'home-middle-3',
 'name' => __( 'Home Middle 3', 'custom-genesis-sample' ),
 'description' => __( 'This is the home middle right section.', 'custom-genesis-sample' ),
) );

genesis_register_sidebar( array(
 'id' => 'home-bottom',
 'name' => __( 'Home Bottom', 'custom-genesis-sample' ),
 'description' => __( 'This is the home bottom section.', 'custom-genesis-sample' ),
) );

/*------- Footer Widget Header --------*/
genesis_register_sidebar( array(
 'id' => 'footer-header',
 'name' => __( 'Footer Header', 'custom-genesis-sample' ),
 'description' => __( 'This is the Footer Widget Headline.', 'custom-genesis-sample' ),
) );

//* Footer Widget Header - the number 5 has to do with priority order of widgets
add_action( 'genesis_before_footer', 'add_genesis_footer_header', 5 );
function add_genesis_footer_header() {
 genesis_widget_area( 'footer-header', array(
 'before' => '<div class="footer-header widget-area"><div class="wrap">',
 'after' => '</div></div>',
 ) );
}
The CSS:
/* ------ Header sections ----- */
.preheader-container {
 /*background: #eaf6dd;*/
}
.preheader-right {
 text-align: right;
 float: right;
 padding-right: 4px;
 margin: 3px 10px 0 0;
 border: 2px solid #ccc;
 min-width: 180px;
 max-width: 40%;
}
.preheader-left {
 text-align: left;
 float: left;
 padding-left: 4px;
 margin: 3px 0 0 10px;
 border: 2px solid #ccc;
 min-width: 180px;
 max-width: 40%;
}
.header-widget-area {
 max-width: 60%;
 border: 1px solid #ccc;
 color: red;
 padding: 3px;

}
.site-header .widget-area {
 float: right;
 text-align: left;
 width: 75%;
}
/* ----- Home Widgets ------ */
.home-featured-full {
 padding: 0;
 /* width: 95%; */
 border: 2px solid #ccc;
 margin: auto;
 padding: 5px;
}
/* Contains home featured left and right */
#home-featured-halves {
 padding: 5px;
 width: 100%;
}
.home-featured-left {
 padding: 5px;
 width: 50%; /* Adjusted 50% */
 float: left;
 border: 2px solid #ccc;
}
.home-featured-right {
 padding: 5px;
 float: left;
 width: 50%;
 border: 2px solid #ccc;
}
/* ----- Home Middle ---- */
#home-middle,
#home-featured,
.home-bottom {
 clear: both;
 padding: 10px 0 5px; /* Adjusted 20px 016px */
 padding: 1.2rem 0 0.2rem; /* Adjusted 1.25rem 0 1.6rem */
}
.home-middle-1,
.home-middle-2,
.home-middle-3 {
 width: 30%;
 border: 2px solid #ccc;
 padding: 5px;
}
.home-middle-2 {
 width: 360px;
}
.home-middle-1 {
 margin-right: 40px;
}
.home-middle-1,
.home-middle-2 {
 float: left;
}
.home-middle-3 {
 float: right;
}
#home-middle a {
 color: #20b40c;
}
#home-middle a:hover {
 color: #ccc;
}
#home-middle .widget {
 margin-bottom: 24px;
 margin-bottom: 2.4rem;
}
#home-middle .widgettitle {
 color: #999;
}
#home-middle li {
 list-style-type: none;
 margin-bottom: 6px;
 margin-bottom: 0.6rem;
 word-wrap: break-word;
}
#home-middle .search-form {
 width: 100%;
}
#home-bottom {
 border: 2px solid #ccc;
 padding: 5px;
}
/* ------ Footer Widgets --------- */
/* Added as an extra area right above the footer. */
.footer-header {
 background-color: #0aed0a;
 clear: both;
 font-size: 16px;
 margin: auto;
 /*max-width: 1140px;*/
 /* padding: 36px 36px 0; */
 border: 2px solid #DDD;

 box-shadow: 0px 1px 10px -4px #000, 0px 0px 40px #EEEEEE;
 box-shadow: 0px 3px 5px #444;
 width: 100%;
 padding: 5px;
}
/* Inner Footer Header area */
.footer-header .wrap {
 padding: 8px;
}
.footer-header .widget-title {
 text-align: center;
 font-size: 30px;
 margin: 20px auto;
}
.footer-widgets {
 color: #999;
 clear: both;
 font-size: 14px;
 font-size: 1.4rem;
 padding: 20px 0 16px;
 padding: 2rem 0 1.6rem;
}
.footer-widgets-1,
.footer-widgets-2,
.footer-widgets-3 {
 width: 30%;
 border: 1px solid #ccc;
 padding: 5px;
}
.footer-widgets-1 {
 margin-right: 40px;
}
.footer-widgets-1,
.footer-widgets-2 {
 float: left;
}
.footer-widgets-3 {
 float: right;
}
.footer-widgets a {
 color: #999;
}
.footer-widgets a:hover {
 color: #ccc;
}
.footer-widgets .widget {
 margin-bottom: 24px;
 margin-bottom: 2.4rem;
}
.footer-widgets .widgettitle {
 color: #999;
}
Adding two new widget areas to a posts page.
– Before Entry
– After Entry

Add the following code to the functions.php file:
/*---- Before Entry -------*/
 genesis_register_sidebar( array(
 'id' => 'before-entry',
 'name' => __( 'Before Entry', 'custom-genesis-sample' ),
 'description' => __( 'This is the before content area', 'custom-genesis-sample' ),
 'before_widget' => '<div class="before-entry">',
 'after_widget' => '</div>',
 ) );

//* Hooks before - entry widget area to single posts
 add_action( 'genesis_before_entry', 'before_post' );
 function before_post() {
 if ( ! is_singular( 'post' ) )
 return;
 genesis_widget_area( 'before-entry', array(
 'before' => '<div class="before-entry widget-area"><div class="wrap">',
 'after' => '</div></div>',
 ) );
}

/* ----- After Entry ------*/
 genesis_register_sidebar( array(
 'id' => 'after-entry',
 'name' => __( 'After Entry', 'custom-genesis-sample' ),
 'description' => __( 'This is the after entry section.', 'custom-genesis-sample' ),
 ) );

//* Hooks after - entry widget area to single posts
 add_action( 'genesis_entry_footer', 'after_post' );
 function after_post() {
 if ( ! is_singular( 'post' ) )
 return;
 genesis_widget_area( 'after-entry', array(
 'before' => '<div class="after-entry widget-area"><div class="wrap">',
 'after' => '</div></div>',
 ) );

}
The CSS:
/* ----- Before entry - single post widget ----*/

.before-entry {
 /* background: url(assets/img/lines.png); */
 border-radius: 10px;
 background-size: 8px 8px;
 margin-top: 5px;
 }

.before-entry .wrap {
 background-color: #fff;
 padding: 32px;
 border: 1px solid #333;
 }

.before-entry p {
 margin-bottom: 20px;
 }

before-entry .widget-title,
 .archive-title,
 .comments-title,
 .widget .entry-title {
 font-size: 20px;
 }

/* ----- After entry - single post widget ----*/

.after-entry {
 /* background: url(assets/img/lines.png); */
 border-radius: 10px;
 border: 1px solid #ccc;
 background-size: 8px 8px;
 margin-top: 5px;
 }

.after-entry .wrap {
 background-color: #fff;
 padding: 32px;
 }

.after-entry p {
 margin-bottom: 20px;
 }

.after-entry .widget-title,
 .archive-title,
 .comments-title,
 .widget .entry-title {
 font-size: 20px;
 }
I also have an older article for creating a widgitized home page layout using Genesis child themes
Resources:
https://github.com/neilgee/genesischild
https://sridharkatakam.com/genesis-starter-child-theme/
https://wpsites.net/web-design/widget-genesis/